Category: educational

  • DevDose: The Real Role of package.json in Your Frontend Project

    DevDose: The Real Role of package.json in Your Frontend Project

    Day Twelve of Devdose

    Introduction:

    I was reviewing a flaky build issue for a new team and noticed something off in their setup. It wasn’t the code, tests, or CI, it was a misplaced dependency in package.json.

    Real-World Issue:

    The project depended on a library only used in the build process, but it was declared as a regular dependency rather than a devDependency. On a clean install, the library triggered a version mismatch on production servers where it wasn’t needed at all. We lost half a day debugging an issue that didn’t belong in runtime.

    Concept:

    "dependencies": {
      "zone.js": "^0.13.0"
    },
    "devDependencies": {
      "@angular-devkit/build-angular": "^17.0.0"
    }

    Knowing where a package belongs matters. Dependencies ship with your production bundle. Dev dependencies do not.

    Insight:

    Treat package.json like a contract. It declares what your project needs to run, build, and test. Misplacing packages pollutes production environments and slows teams down.

    I now review this file line by line when joining a new repo. It’s one of the quickest ways to understand a team’s discipline.

    Conclusion:

    Every engineer should know how package.json works, not just what it is. It’s more than a config file; it’s your app’s first handshake with the ecosystem.

  • DevDose: Understanding Angular’s ngOnInit in the Component Lifecycle

    DevDose: Understanding Angular’s ngOnInit in the Component Lifecycle

    Introduction

    Angular’s component lifecycle is a cornerstone of building robust applications, and understanding hooks like ngOnInit is critical for predictable behavior. This post dives into ngOnInit’s role, inspired by a recent project where lifecycle misuse led to subtle bugs.

    Real-World Example

    In a dashboard application, I encountered a component fetching data in its constructor, causing inconsistent UI updates. The constructor, meant for dependency injection, isn’t ideal for initialization logic. Moving the logic to ngOnInit resolved the issue, ensuring the component was fully instantiated before executing setup code.

    import { Component, OnInit } from '@angular/core';
    import { DataService } from './data.service';
    
    @Component({
      selector: 'app-dashboard',
      templateUrl: './dashboard.component.html'
    })
    export class DashboardComponent implements OnInit {
      constructor(private dataService: DataService) {}
    
      ngOnInit(): void {
        this.displayData         toSignal(this.dataService.fetchData());
      }
    }

    Insight and Reasoning

    ngOnInit is a lifecycle hook called by Angular after the constructor and initial property bindings are set, but before the component’s view is fully rendered. It’s the right place for initialization tasks like fetching data or setting up subscriptions because it ensures the component’s dependencies and inputs are ready.

    Using the constructor for such logic risks premature execution, especially in complex components with asynchronous dependencies. In the dashboard case, ngOnInit ensured data fetching happened at a predictable point, avoiding race conditions and improving testability.

    Conclusion

    Mastering ngOnInit means knowing when and why to use it: post-construction, pre-rendering, for safe initialization. This small shift in approach can prevent subtle bugs and make your Angular components more reliable.

  • DevDose: Build a Minimal Angular Standalone Component Without NgModules

    Day Ten of Devdose

    Introduction

    After years of writing @NgModule boilerplate, I wanted to strip everything down and explore the simplest functional shape of a component using Angular’s standalone API. I was curious about how little was truly needed to render something meaningful.

    Real-world context:

    In a recent prototype, I needed to test isolated UI pieces quickly. Instead of spinning up an entire module structure, I opted to write each component as a standalone unit. The frictionless setup helped validate designs faster without clutter.

    Code example:

    Here’s the most minimal version of a standalone component that renders “Hello world”:

    import { Component } from '@angular/core';
    
    @Component({
      selector: 'app-hello',
      template: `Hello world`
    })
    export class HelloComponent {}
    

    This component can now be used directly in a route, host component, or dynamically loaded. No module required.

    My insight:

    By starting with the absolute minimum, I get a clearer mental model of what Angular actually needs at runtime. I find that building this way leads to more deliberate choices around dependencies, imports, and structure. It also forces me to ask, “Why do I need this?” before adding it.

    Conclusion:

    Standalone components invite you to think in terms of feature boundaries instead of module boundaries. That mindset shift, however small, can reduce cognitive load and improve how teams organise UI code.

  • DevDose: Understanding JavaScript Equality Operators in Practice

    Day Eight of Devdose

    Introduction
    A recent debugging session reminded me how JavaScript’s equality operators can trip up even experienced developers. The confusion between == and === often leads to subtle bugs, so I wanted to share a practical perspective on their differences.

    Real-World Example

    In a Node.js application, I encountered a bug where a user authentication check was failing unexpectedly. The code compared a user input string with a database value using ==. The input “123” was being compared to the database value 123, and the loose equality operator coerced the types, allowing the comparison to pass when it shouldn’t have. This exposed a security flaw, as invalid inputs slipped through.

    Code Snippet

    Consider this example:

    const userInput = "123";
    const dbValue = 123;
    
    console.log(userInput == dbValue);  // true (loose equality, type coercion)
    console.log(userInput === dbValue); // false (strict equality, no coercion)

    The == operator converts operands to the same type before comparison, which can lead to unexpected results, like 0 == false evaluating to true. The === operator checks both value and type, ensuring precision.

    Insight and Reasoning

    The key difference lies in type coercion. Loose equality (==) tries to be forgiving by converting types, which can obscure bugs in dynamic systems like JavaScript applications. Strict equality (===) enforces type safety, making code behavior predictable and explicit. In the authentication bug, switching to === ensured inputs matched both value and type, closing the vulnerability. While == might save a few keystrokes in rare cases, its unpredictability outweighs the convenience in most production scenarios. My rule: always use === unless there’s a specific, well-documented reason to allow coercion.

    Conclusion

    Choosing between == and === isn’t just a style preference; it’s about reliability and clarity. Defaulting to strict equality reduces debugging time and strengthens code integrity.

  • DevDose: Three Ways to Centre a div with CSS

    Day Seven of Dailydose

    This came up while mentoring a junior developer who was puzzled by layout inconsistencies. We explored different centring techniques and why they behave the way they do.

    One real-world case was a login box that wouldn’t stay centred in all screen sizes. We tested a few methods to find the one that best respected responsiveness and minimal CSS.

    Here are three standard techniques for centring a div both vertically and horizontally:

    /* Flexbox */
    .parent {
      display: flex;
      justify-content: center;
      align-items: center;
    }
    
    /* Grid */
    .parent {
      display: grid;
      place-items: center;
    }
    
    /* Margin Auto (horizontal only, needs fixed width) */
    .child {
      margin: 0 auto;
      width: 200px;
    }

    Each method solves a slightly different problem. margin: auto works well for horizontal centring of fixed-width elements. display: flex is more flexible and widely used, especially when vertical alignment is also needed. grid with place-items: center is concise and powerful, but less commonly used outside of fully grid-based layouts.

    In mentoring or code review, I prefer starting with flexbox for its balance of clarity and control, then switching based on project constraints.

    Choose the method that matches the layout’s intent and scale.

  • DevDose: From Div Soup To Semantic Clarity In Service Cards

    Day Six of Dailydose

    Intro

    While updating a pricing section for a client site, I wanted the layout fast. I defaulted to styled divs, but stopped to ask: if this is meant to sell services, why not make it easier for everyone, including search engines and screen readers, to understand?

    The Common Approach

    I sketched a service card using the usual non-semantic elements.

    div class="service-card">
      <div class="service-title">Premium Plan</div>
      <div class="service-price">£49/month</div>
      <div class="service-features">
        <div>Unlimited bookings</div>
        <div>Priority support</div>
        <div>Custom branding</div>
      </div>
    </div>

    This looks fine visually, but there’s no real structure here. A screen reader wouldn’t know what kind of content it is. A crawler wouldn’t understand this is a product or service.

    The Semantic Version

    Here’s the same card using meaningful HTML:

    article>
      <h2>Premium Plan</h2>
      <p><strong>£49/month</strong></p>
      <ul>
        <li>Unlimited bookings</li>
        <li>Priority support</li>
        <li>Custom branding</li>
      </ul>
    </article>

    Element Breakdown

    <article> identifies a self-contained block of content. Use it for product cards, service listings, or feature summaries.

    <h2> is the headline of the offering. It helps maintain a clear heading hierarchy across the page.

    <p> wraps the price. adds emphasis and improves accessibility.

    <ul> and <ui> present the features in a structured, readable format.

    My Insight

    It’s tempting to treat semantic HTML as a concern for blogs or longform content.

    But service pages are often where users make decisions.

    Structure supports that.

    It makes the content more accessible, easier to maintain, and more legible to crawlers.

    Conclusion

    Semantic elements add little friction but improve clarity and meaning. I now use this as my standard layout for service cards, feature grids, and pricing sections.

  • DevDose: Practical Git Habits That Make Daily Dev Work Smoother

    DevDose: Practical Git Habits That Make Daily Dev Work Smoother

    Day Seven of Devdose

    Most developers know what Git is, but not everyone uses it in a way that truly supports clean, thoughtful engineering. This post isn’t a Git primer. It’s a look at a few habits I’ve adopted to avoid chaos in day-to-day coding.

    A Few Practices That Have Stuck

    One habit I’ve grown to rely on is merging frequently, ideally every hour or two. This keeps changes small, encourages working in safe, testable increments, and reduces the chance of painful merge conflicts. It also forces me to think about how to integrate unfinished work without breaking anything. That might mean wrapping logic in feature flags or using conditional rendering to isolate updates until they’re ready.

    I also try to keep atomic commits. A commit should do one thing, whether that’s renaming a method or adding a new function. This habit makes code reviews cleaner and makes it easier to understand history later.

    My Personal Merge Workflow

    I avoid rebasing in most cases. Instead, I use a simple pattern that’s worked well in team settings:

    # Rename old working branch
    git branch -m feature-a-old
    
    # Checkout fresh master and pull latest
    git checkout master
    git pull
    
    # Recreate working branch and merge old changes
    git checkout -b feature-a
    git merge feature-a-old

    This keeps my branch history simple, avoids rebase conflicts, and makes my changes easier to review. Some might argue that rebasing is cleaner. I find this approach more predictable and easier to manage, especially under pressure.

    The Bigger Picture

    None of this is about mastering every Git command. It’s about building small, repeatable habits that protect your focus and your team’s sanity. You don’t need to know every edge case, but you do need to commit intentionally and communicate clearly through your commits and merges.

    Takeaway

    Git isn’t just a tool to back up your work. It’s an opportunity to improve how you think about change. Small merges, clean commits, and a calm workflow go a long way in making codebases and teams more resilient.

  • DevDose: Reflect and Iterate: Two Habits That Sharpen the Craft

    DevDose: Reflect and Iterate: Two Habits That Sharpen the Craft

    Day Six of Dailydose

    I’ve wanted to keep a developer log for years. I always felt it would add a level of professionalism that’s often missing in day-to-day coding. Recently, using GPT to help prompt reflection points finally gave that idea some structure. Just a small bit of research and prompting unlocked something bigger: a habit of daily thinking, not just daily doing.

    I call myself a software engineer rather than a developer or coder, because I hold myself to a professional standard. That includes clean code, testability, proper patterns, and yes, reflection. Whether or not you write a formal log, taking time to think about the decisions you made can uncover gaps and improve your work.

    This isn’t about rewriting everything. It’s iteration. Maybe you used a dumb component where it made sense, wired up DTOs and facades, and just moved on. But when you revisit it, some names no longer make sense, or a pattern you used has evolved. It happens. That doesn’t mean the original code was wrong, but it might mean there’s a cleaner way now.

    What worries me is when developers just get something working and throw it in without a second look. Sadly, I’ve seen that happen more often than I’d like. That lack of reflection leads to brittle systems and technical debt that builds quietly over time.

    Takeaway: Reflecting doesn’t slow you down. It sharpens your decisions. Iterating on your own code, even slightly, is a sign of engineering discipline, not indecision.

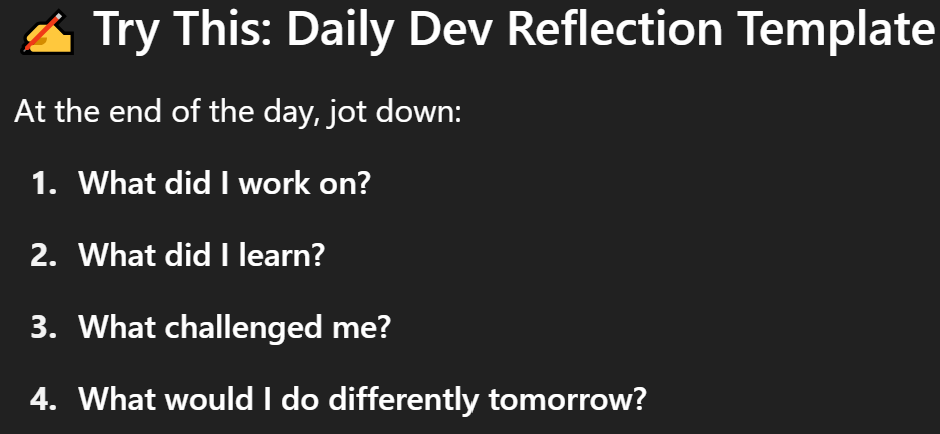
    The list Chat GPT provided to assist in daily logging (they were bonus content, nothing I asked for)

  • DevDose: Goal Setting Frameworks

    Day Four of Devdose

    Today’s DevDose is a quick nudge about goal-setting frameworks, nothing fancy, just tools to help you stay on track.

    You’ve probably heard of things like SMART goals, OKRs, Eisenhower Matrix, maybe even used an app or two built around them. But underneath all the acronyms and UI polish, they all aim to do the same thing: help you get stuff done.

    Here’s my current mix:

    A daily OneNote list with 3 simple personal tasks (usually home-related)

    A quarterly “big goals” page I review every now and then (it’s mostly for brainstorming)

    An OKR app, yes, it’s for business, but I hijack it for personal goals too because the visuals are helpful

    None of this is magic. The trick? Reviewing them regularly. And yeah, actually doing the tasks. 😬

    So if your to-do list still lives in your head, open a tab, search “goal setting frameworks,” and give one a shot. The right one might just stick.

  • DevDose: Notes About Note-Taking

    Day Three of Devdose

    Today’s DevDose is a bit meta. It’s about note-taking itself.

    I realised something while digging through a few YouTube videos and blog posts: I take loads of notes… and barely ever read them again.

    I used to believe that the act of writing things down helped me retain what I learned. And maybe it does, for a little while. But if I never revisit those notes, the info just fades. Fast.

    Apparently, there’s a technique for this called spaced repetition, where you review notes over time to really lock them in. Made me think most of my current notes are just clutter.

    On a brighter note (ha), I discovered Obsidian today. It looks like a solid tool for organising and surfacing notes that matter. So I’m planning to audit my notes, keep what’s useful, and start building a second brain I might actually use.